The main purpose of this troubleshooting section is to help you maintain your mower in proper condition for years and repairing smaller issues that can be done in house without service station. Remember that it is always recommended to repair or troubleshoot your mower at a service station. Every Dixon mower has a plate with a serial number, this serial number will be needed for purchasing replacement parts, additional accessories as well as finding online users manual.
Safety first!
People with not familiar with Dixon mowers shouldn’t attempt to repair it. Mowers are highly dangerous (life and health danger) appliances when not used properly. Most accidents happens by accidental contact with blades, therefore you shouldn’t run the blades when there are people around, especially children because if not used properly mower can also run over them. Pay special attention when reversing. Mow grass only when it is dry and pay special attention to bumpy areas, any kind of obstacles. If unsure if your mower may tip over the slop, test mower with blades off and never reverse on a slop. Occasionally mower can strike pieces of wood, small stones etc- depending from the area you are mowing. Whenever maintaining mower hardware pay special attention to safety rules not to case fire. Mower engine should be cold before re-filling the the gasoline.
When operating Dixon mower wear all safe clothing available (shoes, gloves, glasses, trousers). Switch off the engine wherever mower is not in use, never leave your mower unattended. Mower shouldn’t be winterized with the fuel in the tank.
Mower cleaning
Dixon mowers should never be cleaned by high pressure commercial washes as it easily leads to corrosion of electrical components or damage to the sealed bearings used on your mower. Dixon mowers should be cleaned by hand and with the use of the mild household soaps and low water pressure. You can also use a stiff brush to loosen excess grass and dirt build up. Water pressure shouldn’t be directed onto the mower deck hub assemblies, electrical wiring and engine components such as air filter openings. We recommend to to engage the mower deck for a short time to disperse all water from pulleys and belts, alternatively you can blow water extension off with compressed air.
Dixon service and maintenance
In order to assure long, proper and high quality Dixon mowers operation following service and/or maintenance should take place after the first 30-50 hours of operation and on a weekly basis or every 50 hours of use:
- mower deck belts
- tire pressure
- drive system and controls
- tightness of all bolts and nuts
- hydrostat oil
- electric blade clutch air gap setting
Table 1. General Dixon mower troubleshooting
| Issue | Possible cause | Action |
| Cut of poor quality | Ground speed | Reduce mowing speed |
| Cut of poor quality | Loose belts | Adjust per operators manual |
| Cut of poor quality | Engine RPM too little | Set RPM megine to max value |
| Cut of poor quality | Bent or dull blades | Replace or sharpen as required |
| Cut of poor quality | Mower deck unleveled | Adjust as specified in the user’s manual |
| Cut of poor quality | Grass accumulated at the mower deck |
Clean theunderside of your appliance |
| Cut of poor quality | Improper blades | Replace with original equipment blades which are designed for the Model |
| Cut of poor quality | Uneven tire pressures | Check and adjust as required per operators manual |
Table 2. Drive system related Dixon mower troubleshooting
| Issue | Possible cause | Action |
| Mower pulls to one side or the other | Drive adjustment | Adjust per operators manual Consult your dealer for repair |
| Loss of drive power on one side or the other |
T-Box belts slipping | Adjust per operators manual Consult your dealer for repair |
| Loss of power on both wheels after being operated for a length of time |
Belt from engine to T-Box is slipping |
Adjust per operators manual Consult your dealer for repair |
| Poor driving performance |
Operation of mower | Review operators section of owners manual |
| Oil leaks | Loose or missing hose clamps |
Tighten or replace as required |
Table 3. Electrical system related Dixon mower troubleshooting
| Issue | Possible cause | Action |
| Starter will not turn engine over |
Circuit breaker engaged | Push button to reset Consult your dealer for repair |
| Starter will not turn engine over |
Dead battery | Charge battery |
| Battery discharge | Poor connections on battery Battery water low Wrong battery installed in mower |
Tighten or replace as required |
| Battery discharge | Engine electrical system not functioning correctly |
Have electrical system checked by your dealer |
| Battery discharge | Engine being operated at too low an RPM |
Increase engine RPM Contact your dealer for information |
| Electric clutch will not engage mower deck blades |
Low battery condition Poor connections on clutch switch Broken wiring |
Repair or replace as required Consult your dealer for repair |
How to start my Dixon mower?
Starting procedure of your Dixon mower may vary depending on a model. Different operating instructions are accessible for walk after-mowers, zero turn mowers and tractors. Below procedure is a good example for zero turn mower.
- Release the parking brake
- Move throttle control to choke position once engine is cold or full throttle if warm
- Check the fuel and oil levels, if all right then
- Insert the ignition key and turn it. Once engine start release the key, as it will stay in run position
- Move throttle from choke to the proper position- depending on your speed
Important notice! When you are in move and blades are engaged, throttle control should always be set to max to make sure that there is enough engine cooling. Mower’s engine won’t be restarted when blades are in operation or/and the parking blade is in off position. Although safety switches are designed to stop the engine once operators leaves the seat, but you should always turn the engine off when leaving the mower and not relay on the safety equipment.
Old seat replacement procedure
- Unscrew all the screws and remove the old
- Bring the new seat and place it next to the mower. First place armrest bracket against seat back, match mounting holes in bracket and seat back.
- Insert necessary screws and screw tight, repeat for all the armrests. Once done re-tighten all screws
- Place/fix back cover to seat back. Secure with proper screws and washers where needed
- Fix screws to the mounting brackets, repeat for all armrest
- Center utility box on seat back cover and fasten with drill, tap screws and washers where needed
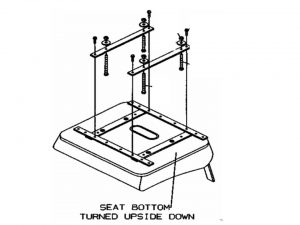
- Install all-thread hex head bolts into seat straps. Each bolt needs to be secured by think washer and a strap. Do the same for all the bolts
- Attach seat straps to seat bottom as shown on the picture below
- Place seat assembly on body, and connect safety switch
- Firmly hold seat assembly against body with one hand while body is raised to fully open position. Continue to hold seat against body to prevent damage to seat safety switch
- Install flat washers in all seat knobs and nuts on the front studs
How to do a hydrostat transmission check?
Normally hydrostat checks are being done at the factory and mowers don’t need much adjustment before first drive, however it is always advice to check that there is enough pressure relief bypass on each transmission before first drive. Hydrostat pins are located at the rear of the hydrostatic unit. A bypass keeper is provided to allow the mower to be rolled around without complete servicing of the unit. The bypass keeper springs should be positioned to depress the bypass relief pins. The bypass keeper springs should be removed prior actual mower’s operation.
Air gap adjustment procedure
In order to adjust the air gap you should remove the clutch from the engine and find the three rivet joints which fasten the leaf springs to the armature. After this you will need to rotate the pulley until these rivet joints are located midway along the edge of the triangular field adapter. Then find the three holes in the brakeplate, one near each adjustment nut. Insert a .012 inch feeler gauge into one of the three windows. Be careful to position the feeler gauge between the rotor and armature faces as shown on the picture below.
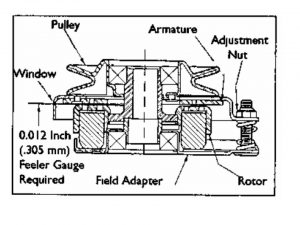
Fix the nut adjacent to the window with the feeler gauge inserted until the gauge fits snugly between the rotor and armature. The gap should not be so tight that the feeler gauge cannot be reinserted after removal. Do the same for all remaining windows. Perform minor adjustments if necessary. Re-install the clutch to the engine.
OHMS test procedure
- Disconnect clutch from mower wiring harness. It can be found the right side of the mower frame
- Set the multi-meter on RX1 and attach the two leads to the two wires coming from the electric clutch
- The reading you receive should be between 2.4 to 2.9 OHMS. If the resistance is outside this range the clutch coil is faulty and needs to be replaced
Deck removal procedure
In order to remove the deck you should stand oposite of your machine, grab with your left hand the lift quadrant lever. Lever up to align with the bottom hole (5th) located on the quadrant plate. Then connect brake link into hole on lift lever. Move lift lever toward lowest cut position and remove belt from the top of center deck hub assembly.Now you can remove the hair pin cotters from the ends of the deck support rods. Slide deck support rods from deck while supporting deck assembly with a suitable brace. Reverse logic should be followed in order to re-install the deck
Cutter blade removal procedure
In order to remove the cutter blade you should place deck assembly so that you gather the access to the to the blade bolts. Hold blade from turning while bolt is removed from the center of each hub assembly. When putting back the blades remember to fully tighten blade bolts (min. 60 ft lbs torque)
Belt tension adjustment procedure
Serpentine deck belt tension is maintained by a manual adjustment rod which is located on the top of the mower deck assembly. Proper belt tension is critical to insure cut quality. If adjustment is required you need to tighten lock nut on adjustment rod until belt free play or movement between pulleys is approximately 1/4 of an inch.